
You are currently browsing the category archive for the ‘Preschool Activities’ category.
The last few rainy days have kept us inside in search of something silly and fun to pass the time. We do like to get out and dance in the rain, but today was just too cold. We were bored and in need of something different to occupy ourselves. I took a look around the house to find something new, something we haven’t already done a billion times. Well, as luck would have it I checked out a couple of books from the library last week with a ton of fun things for us to do! And I found a craft that is super easy, using only things we have in the house where we can stay warm and dry.
MATERIALS:
- Tissue Paper
- Marker
- Scissors
- Large dinner plate
- Tape
- Balloon

Unfold the tissue paper completely and lay it flat on the table. Trace the outer edge of a dinner plate to create a circle.

Draw a snake shape inside the circle, or simply cut into a spiral leaving room to make a head. If you want you can draw on eyes and tape on a small tongue.

Next comes the fun part. Tape the tale of the snake to the counter. Blow up the balloon and tie the end. Now rub the balloon against your head (or something wool if you have it) to create an electrostatic charge. Now, laugh at how your hair stands straight up! Then apply balloon to the head of your snake. As you raise the balloon the tissue paper snake should attach its self and follow the balloon. This looks like you are charming the snake.


That’s it! A fun, quick craft that my kids enjoyed. They continued to play with the balloon without the snake because when you are six nothing is more special than a balloon; even if it can make you a snake charmer. Hope you are surviving the rainy days of Spring!
The Whatever Mom is a full-time wife and twin mama living on coffee and wine. She enjoys the pure rush of cleaning the BIG potty between loads of laundry. It is her dream that moms everywhere accept and embrace the Whatever Mom philosophy which can be found here. You can also find her musings and popular shares on Facebook and Twitter. Stay up to date with her creative ideas and outings on Pinterest.
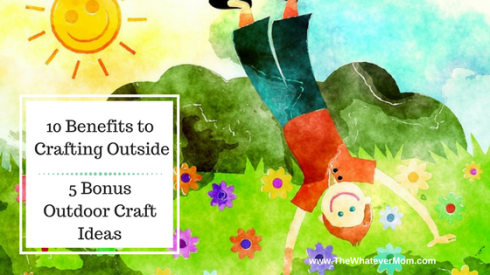
With the warmer temps beginning this week I am looking forward to getting outside! However, it can be a challenge to get my kids outside. Once they are outside they will play, but I typically have to set the stage for them first. As a mom I am totally baffled by this. When I was a kid you could not keep me inside the house. I was happiest sitting outside under a big tree watching the clouds going by, or racing up and down the neighborhood street. Not sure how I ended up with two kids who need to be prompted to be outside.
I have discovered if I set a craft up outside they are more motivated to join me in the back yard and will likely stay outside longer. It can be a simple craft, or an entire project, but it helps transition to spending time outside.
By now you all know the benefits to getting kids outside. But just in case, here are 5 more reasons:
- Kids who interact with nature tend to engage their imaginations more and invent their own games. This involves critical thinking and observation of what’s in their environment.
- When kids are more physically active they are building gross motor and fine motor skills.
- Kids who spend time outside more tend to develop a lifelong love of nature and see the need to preserve it.
- Kids tend to develop more visual and spacial skills when learning to navigate natural environments.
- Anyone who spends time outside feels less stressed.
You may have heard the benefits of kids crafting. I like to be thorough so again, here are 5 more benefits:
- Crafting benefits executive functioning. Having to plan a project or craft and lining up each step helps kids with focus and memory skills.
- Develops fine motor skills. This helps with handwriting and coordination.
- Helps kids recognize patterns and sequence recognition.
- Crafting builds on long term academic skills like math and reading.
- Teaches social interactions like learning to share and use manners when sharing.
Why not combine these benefits and craft outside? The bonus is you can make a mess outside and not worry about having to clean it up right away, or any of the materials staining your nice dining set.
Outside crafts to do with your kids
If you are tired of the old standby of bubbles and sidewalk chalk try these 5 things to amp up your outdoor craft time.
Make colorful bubble art. Simply pour some bubble mix into a shallow bowl and add food coloring. Mix well and use the bubble wand to soak up the mixture. Blow bubbles right in front of the paper or canvas to be sure they land and splatter on the surface. This will make a really unique print for your house. Or turn the paper into personalized stationary.
Paint some rocks. You can paint rocks to add some color to your back yard, or create a fun tick tack toe set by painting three similar rocks to look like lady bugs, and another three rocks a solid color. If you really want to make a fun project sign up to paint some Kindness Rocks to leave around your community, or for friends and family to find in your back yard.
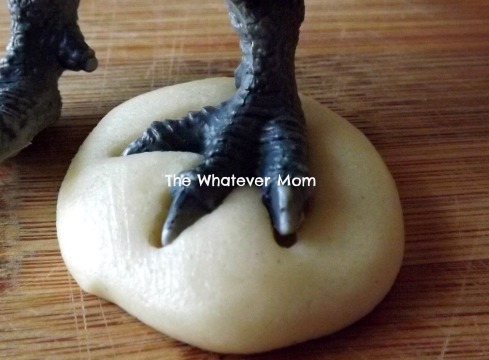
Make your own fossils. This was fun when we did it with cookie dough, now I can’t wait to try it with baker’s clay. Simply roll a small piece of dough into a ball and press flat between your hands. Then press a leaf, or pine cone, or blades of grass into the clay to create a fossil imprint.
Design a paint brush from nature. Simply dip flowers into paint and press flat against your paper to make a pretty print. You can also dip leaves, feathers, a bundle of pine needles or stems into paint and use them like a paint brush.
Re-imagine your water table. When my kids were really little we used the water table for more than just water fun. We filled it with things like shaving cream, a bubble bath for dinosaurs and cornstarch with water (it creates a really fun solid that melts into your hand).
Crafting outside has long term benefits for kids, and the combined benefits create life long skills sets. You don’t need to wait for summer vacation to give any of these ideas a try. As soon as the weather is nice enough to be outside skip the chalk and do something a little different! Your kids will always remember the fun you have together, no matter the craft.
The Whatever Mom is a full-time wife and twin mama living on coffee and wine. She enjoys the pure rush of cleaning the BIG potty between loads of laundry. It is her dream that moms everywhere accept and embrace the Whatever Mom philosophy which can be found here. You can also find her musings and popular shares on Facebook and Twitter. Stay up to date with her creative ideas and outings on Pinterest.

Today we experienced the craziest snowstorm in our children’s lives! They watched out of the window for almost an hour with stunned looks on their faces as the snow fell. “Wow. Look at all that snow!” That hour gave me a little time to prep some fun things to do since we are now home-bound during the blizzard of 2017!
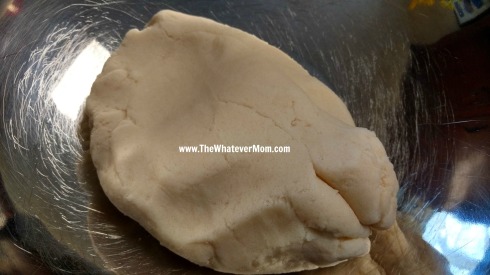
Last year I shared with you our favorite DIY Play Dough recipe. It is super simple to make and we make it smell great and get some really cool colors with Kool Aide. Well, this year we have discovered that our kids cannot tolerate artificial food coloring. Even though they aren’t eating the play dough (that I am aware of) the dye can still get in through the skin.
I see all of these amazing recipes for colorful play dough and we just can’t create them at home, and the all natural food dyes you buy in the store are very expensive. Making our own dyes is an option, but it is too time consuming. I still can’t get some of the beautiful pastel colors from making dyes at home. So, I had to find some way to make our newest batch of play dough fun and pretty.
The Recipe (as found on Hello Giggles):
1 Cup Flour
½ Cup Salt
3 TBSP Cream of Tartar
1 TBSP Oil (canola, coconut or sunflower)
10-20 Drops Essential Oil
½ Cup Boiling Water
Add all dry ingredients to the bowl, add all oil ingredients and then add hot water and mix until solid.
If we skip the food coloring the dough doesn’t look so special. But I thought I’d mix a batch anyway so we have something fun to play with. Maybe I’ll add a little essential oil to jazz it up. At least if it doesn’t smell like homemade dough made from flour it won’t be so bland.
After I mixed it up in the bowl it sat there boring and blah. Until one of my daughters said to me, “Wow it’s white just like Elsa’s hair.” BINGO!! We have a winner!
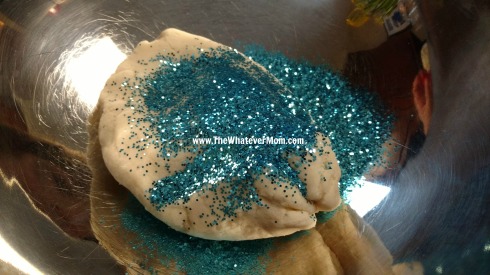
I decided to add in my favorite essential oil blend called “stress less” to help us let it go, let it go (ha! My friends who love puns will enjoy that one). Then my girl remembered we have some, “frosty blue glitter like Elsa’s dress.” And of course we dumped in as much as we could! My girls are ALL-IN when it comes to glitter.
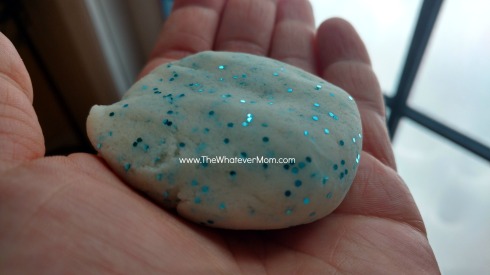
There ya go! Dye free and sparkly play dough that keeps the kids feeling stress free! Store it in a zip lock bag, or air tight container. Now if only cleaning up all this snow was as easy and stress free.
The Whatever Mom is a full-time wife and twin mama living on coffee and wine. She enjoys the pure rush of cleaning the BIG potty between loads of laundry. It is her dream that moms everywhere accept and embrace the Whatever Mom philosophy which can be found here. You can also find her musings and popular shares on Facebook and Twitter. Stay up to date with her creative ideas and outings on Pinterest.

So far we have had a dreary couple of days of crazy winter weather. The temps have been up and down. We have had rain, snow, sleet and ice. It doesn’t feel like a really colorful time of year. Thankfully February brings some fun colorful activities into our world. We do a lot to celebrate Valentine’s Day at home, like making gifts for our friends, but we often overlook President’s Day. It isn’t as sweet as Valentine’s Day so I am always stuck on fun things to do with my kids. This year I’m feeling (a little) more prepared.
My kids are in school and I am sure their teachers are doing a fantastic job teaching them about our country’s presidents and what it means to be the president of the United States of America. Maybe your kids aren’t in school just yet, or maybe you homeschool, or you simply want a few fun things to do on your extra day off with the kids. So here are some fun things to do!
5 fun activities to celebrate President’s Day:
Exercise your right to vote. Let your kids vote on breakfast. Pick two breakfast foods and hand out ballots to cast their votes. Anyone who is eating breakfast gets a vote and the most popular vote wins. It is a quick and easy activity, but it gives young kids a taste of the election process. (Pun totally intended).
Help your child imagine a better world. Ask your kids to write down their answers to this question, “If I were President I would …” Not only will it be fun to hear their answers, but this can help kids imagine the good things they can do in this world.
Take a trip to the library. I know this is my go-to answer for everything. If we are bored we head to the library. But that’s because there is so much to learn and do there! If your child is old enough to read check out a couple of age appropriate books that describe the presidential process or a biography on a specific president. Check the library calendar there may even be some fun President’s Day themed activities happening right there.
Always stop for a snack. Anything you can think of that can represent the red, white and blue of the American flag is easiest. For example: a berry and yogurt parfait, or a bagel with cream cheese and fresh berries. If you are feeling ambitious make some cupcakes together, use white frosting with blue and red sprinkles. I like to use whatever we have on hand. Pull out some ingredients and let your kids get creative.
Show them the money. Take out any cash you have on hand and Google some facts about the president you see. My kids love when we get to ask the phone some questions. It is pretty amazing to me that we can speak a question into this little piece of technology and have answers in seconds. When I was the same age as my kids I’d have to walk across town, enter a building, pull open a drawer in the card catalog and find directions to a book hidden somewhere on a shelf. That was like half a day! Kids today … they don’t know how good they have it.
I like to keep things simple, yet celebratory. This isn’t one of those holidays you need to go completely elaborate with. Choosing any of these activities adds just a little fun and acknowledges the day.
The Whatever Mom is a full-time wife and twin mama living on coffee and wine. She enjoys the pure rush of cleaning the BIG potty between loads of laundry. It is her dream that moms everywhere accept and embrace the Whatever Mom philosophy which can be found here. You can also find her musings and popular shares on Facebook and Twitter. Stay up to date with her creative ideas and outings on Pinterest.
What is fine motor skills anyway? Basically fine motor functions include the muscle groups needed for handwriting and hand eye coordination. Focusing on crafts and art activities that require kids to use small and coordinated movements helps build on those skills and develop those muscles.
My kids are still young and working hard on those fine motor skills. So we tend to focus on projects that help us work those small muscle groups and flex those fingers. When I found this project I thought it looks fun and like a great way for us to work some skills without it feeling like work.

Materials:
Paper plates
Hole punch
String or yarn
Scissors
Exacto knife
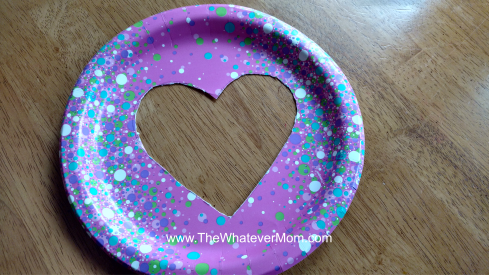
First you will need to cut out a heart shaped template. You can cheat (like I did) and print a heart shape to cut out, or simply fold a paper in half and cut out a heart. Next you trace around the heart shape, and last use the exacto knife to score (or cut depending on how thick your plates are) the shape. I did this part for the kids, but they used the scissors to cut out. If your knife does not cut all the way through use the scissors to cut the shape out of the plate.
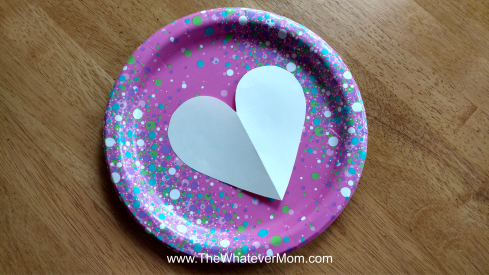
After you cut the shape, use the hole punch to punch individual holes around the outside of the heart (go through the inside of the heart).
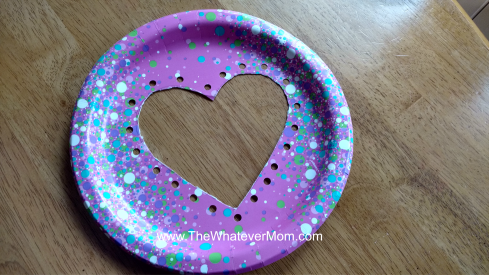
We taped one edge of the string to the back of the plate so we could push the other end through the holes. Zig-zag your stitches to allow for a more unique design. If the ends fray a bit, just wrap in tape to give it a sturdier end, or if you have a kid friendly sewing needle you can use that to guide the string through.
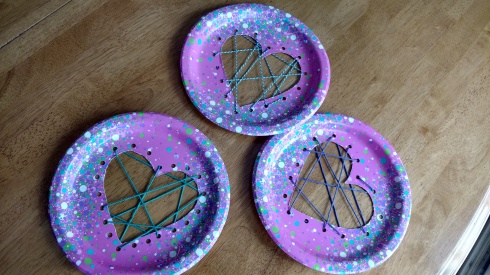
When you are complete this will make a really unique Valentines’ day decoration, or a fun piece of art to hang in your window to admire. How easy is this? You are done in ten minutes, no mess and your kids just worked on hand eye coordination.
My kids discovered this bonus craft. Punch holes around the outside of the heart shape you cut out of the plate. Attach a piece of string to the back and use it to lace around the outside edge. Viola! A homemade lacing card! It’s amazing what your kids will think of when you get them creating!

The Whatever Mom is a full-time wife and twin mama living on coffee and wine. She enjoys the pure rush of cleaning the BIG potty between loads of laundry. It is her dream that moms everywhere accept and embrace the Whatever Mom philosophy which can be found here. You can also find her musings and popular shares on Facebook and Twitter. Stay up to date with her creative ideas and outings on Pinterest.

A few months ago we decided not to throw our kids a birthday party. I know, how horrible. Instead we took a week-long vacation in the Berkshires. I get that sounds all pretentious but I swear we are average folks. I smuggle my peanut butter jelly sandwiches into places just like every other mom. But we decided for the cost of a two hour party we could give our kids some really fun experiences they will always remember.
We visited a lot of great places and enjoyed trips to several museums where we found science, art and history exhibits. We even saw a Teenage Mutant Ninja Turtle exhibit which made me and hubby feel a little old. Not only do we remember the first time we watched the original movie (which was playing on a continuous loop), but we remember playing a Nintendo game unit like the one now old enough to be on display as a “classic.”
I digress.
One of our favorite stops was the Eric Carle Museum of Picture Book Art. My kids loved making art in the art studio, reading and relaxing in the library and seeing art work from their favorite authors on display.
Here is what we enjoyed!

The art studio is a large sunlit room bursting with creativity. The resident artists select a craft project each day to share with visitors to the studio. All the materials and instruction are free. There are convenient drying wracks just outside the studio entrance where you can leave your creations while you tour the rest of the building. If you have kids of different ages and stages there are fun hands on play stations for your little ones to enjoy.
The galleries offer a look at original art work created by Eric Carle and other renowned picture book artists. Our favorite by far was the Brown Bear 50th Anniversary exhibit. We could see different versions of the way the animals were drawn. We immediately found the reading area which provided books and comfy brown bear cushions to cozy up to while reading. There are a variety of ways kids can interact with the art and games to help them talk about what they see. Each of the gallery rooms is minimal with plenty of room to navigate a stroller or wheel chair through. But no pictures are allowed for this exhibit.

The library was the big hit for my kids. Not only did they have access to kids’ books, but they were obsessed with the giant stuffed versions of the book characters they love. Brown Bear was carried around by just about every kid that came in. There are also lots of learning toys like latch puzzles, magnet puzzles and coloring pages. Hubby and I enjoyed getting to sit down and relax a bit while our kids had a safe place to roam. There are kids story times and other events taking place so be sure to check the schedule before you travel!
The Auditorium offers concerts and educational films. We arrived between movie viewings so we did not get to check out the auditorium. But you can check online to see what film or concert is being offered on the day you visit.
The Bookshop is filled with a lot of fun games, stuffed animals and unique gift ideas. We found some great post cards featuring art from our favorite Eric Carle books. I bought extras to frame when we return home.

Everything about this museum is designed with families in mind. You can request extra diapering supplies from the front desk, borrow a stroller or wheel chair and the coat room has individual lockers with a key to stash your diaper bag and extra stuff you don’t want to carry. There are activity kits to borrow to help your kids have a more interactive experience (I didn’t see those until we were on our way out). The museum admission price is also family friendly $22.50 covers a family of two adults and two kids.
Since our visit was in November it was a little too chilly to check out the art sprinkled along the walking trails and museum grounds. You can also find picnic tables outside to enjoy that homemade peanut butter sandwich right out in the open. Or you can stay inside and enjoy a non-smuggled lunch right in The Carle Café where they offer free coffee and organic/natural vending machine fare.
The museum is located in Amherst, MA which is approximately 2 hours from where we are in Ulster County. This is a great place to take your young art lover and little reader. It is a perfect day trip for families and especially accommodating for every age group. Older kids can read and learn details about the art exhibits, create art and there is plenty to keep their younger siblings busy and engaged.
The Whatever Mom is a full-time wife and twin mama living on coffee and wine. She enjoys the pure rush of cleaning the BIG potty between loads of laundry. It is her dream that moms everywhere accept and embrace the Whatever Mom philosophy which can be found here. You can also find her musings and popular shares on Facebook and Twitter. Stay up to date with her creative ideas and outings on Pinterest.
So this was a crazy week at my house. I had a lovely stomach bug that set me back an entire weekend and made for a crazy week of catching up. As a result I was busy rushing around, maybe a little too fast, and smashed my hand. I thought I broke my thumb, but thankfully it is just a wicked sprain. Five days later and it is still swollen and really hurts. As a crafty blogger that kind of limits what I can do with one hand. I thought about sharing five different ways to splint an injury using only a Popsicle stick, but realize that doesn’t really qualify as a craft.
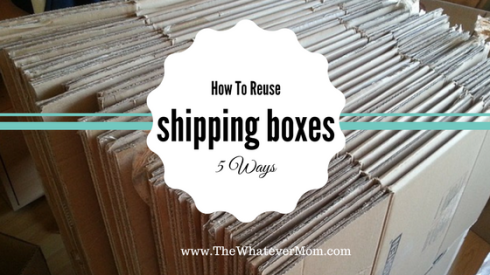
I shared with you last week 7 fun things to do with bubble wrap, so I thought I’d share what to do with all those left over shipping boxes!

We didn’t make anything this week due to the aforementioned hand injury. But, we did do a little research!
My kids and I are hooked on watching videos on Box Yourself YouTube channel. What this guy can make from a box or cardboard tube is amazing! You need extra supplies like paint and a box cutter, but if you are in a serious project mode, or have an older kid, these could be fun!

If you have really little kids you could literally give them a box to play with and they’ll magically turn it into something fun simply using their imagination. If you want to add some color without making a mess, just give them a box of crayons or washable markers and some stickers. Prepare for some quiet entertainment.
Here are 5 ways we’ve used left over shipping boxes:

BOX TUNNEL – every kid loves to climb into a cardboard box. It feels like a little space just for them. Tape together several large boxes end to end and allow your kid to crawl through. If you are feeling really ambitious you can poke holes in the top and push through Christmas lights. This makes a fun starry effect inside the tunnel.
AUTOMOBILES– help your kiddo transform a plain box into a car or truck. Use paper plates for the wheels, duct tape to make lines for windows and doors (if you don’t want to deal with paint). You can make a steering wheel from a paper towel tube and another paper plate, or cardboard circle. Your kid will spend hours driving this car through their imagination. Throw in a pillow and blanket, park the car in front of the TV and you have an instant indoor drive in.
DIARAMA– building small scenes inside of a box can help kids really use their preplanning skills to imagine a small world inside an ordinary box. Once your child selects a theme they can draw a scene inside the box, or glue items inside to create a 3-D effect.
CITY SCAPES– set up a row of boxes and let your child paint a different store front on each. Again, if you don’t like paint hand them markers instead. Attach signs for Bakery, Grocery, and Barber etc. Your kid can pretend to run errands with their stuffed animals in tow.
TREASURE CHEST– let the kids decorate any way they like and use to store their favorite treasures in. My kids like to pretend they are pirates discovering hidden treasure. Super easy and super fun!
Hope you are enjoying the Christmas break with the kids and remember boxes are better than any toy at any age! But if your household has outgrown the magic of finding a good box, you can always use them to pack up donations in and send off to your local Good Will, OR other favorite charity. Here’s how.
Wishing you all a Happy New Year! Here’s to much healthy and happiness in 2017!! As always thanks for reading each week!!
Oh and p.s. if you are looking for a fun way to use those paper towel tubes, check out my post from last year, Pom-Poms and Cardboard, Expensive Toys Are Overrated.
The Whatever Mom is a full-time wife and twin mama living on coffee and wine. She enjoys the pure rush of cleaning the BIG potty between loads of laundry. It is her dream that moms everywhere accept and embrace the Whatever Mom philosophy which can be found here. You can also find her musings and popular shares on Facebook and Twitter. Stay up to date with her creative ideas and outings on Pinterest.
So this is a record breaking Christmas season here at the “casa de Whatever.” Not only did my husband and I put the tree up and decorate it without a complaint, but this is also the first time in a decade he has his Christmas shopping finished the first week of December. I know… give that man a round of applause. What’s his secret? Amazon, baby! Yep, he finally caught up with the times and shopped for everything online this year and had it shipped to the house.
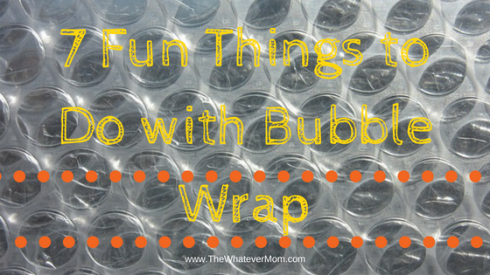
This may have saved him a lot of time, but now my house is filled with boxes and left over shipping supplies. And now, we have extraordinary amounts of bubble wrap! This is free entertainment! Popping it is so much, but I started to wonder what other fun I was missing out on.
Here are 7 Fun Things to Do with Bubble Wrap:
PRINTS
The bubbles on the plastic wrap make such a cool texture once you paint and print with it. You simply, lay a piece of bubble wrap flat, paint it and then flip it over to print on paper. Nope, you’re not missing a step, it really is that easy!
SHAPES
You can cut out different shapes to paint and print with. This works great for making animal shapes, especially animals with scales like a fish, or lizard. You can also just make shapes that your little one can recognize and let them pop away for a multi-sensory learning experience.
STOMP & PAINT
Wrap your kids’ feet in plastic wrap and let them stop around to make a popping sound. If you want to level up a parenting notch, let them walk through paint and step along a sheet of paper leaving behind tracks.
ROADWAY
Tape squares of bubble wrap, or a long piece of wrap to the floor. Use blue painters tape for easy removal and tape along the edges. Let your kid drive their cars over it until they pop every last bubble.
SENSORY FUN
If you have a small piece of bubble wrap, insert it into a Zip Lock baggie and pour in a little paint. Seal it up and let the kids (or you) squish it around. This has a really cool feel!
UNIQUE GIFTS
I found this on one Pinterest. Making a stress relief pack requires bubble wrap and a label that reads, “For maximum stress relief pop 3-4 capsules several times per day.” Super cute and fun! Give out to your kids teacher, the mail man, your office partners. Anyone who could use a good laugh for stress relief.
A few years ago when the girls were just toddlers, I took them to a Little Picasso art workshop at a local library where we painted bubble wrap. The kids absolutely loved it! It was messy and noisy fun for everyone! If you don’t want to get messy with paint, bubble wrap is totally fun on its own. Lay it on the floor and stomp on it, roll on it, go slow and pop one bubble at a time, or even roll it up and twist it. There is no wrong way to play with bubble wrap!
he Whatever Mom is a full-time wife and twin mama living on coffee and wine. She enjoys the pure rush of cleaning the BIG potty between loads of laundry. It is her dream that moms everywhere accept and embrace the Whatever Mom philosophy which can be found here. You can also find her musings and popular shares on Facebook and Twitter. Stay up to date with her creative ideas and outings on Pinterest.
Living in the Hudson Valley means we have an abundance of festivals, street fairs, art shows, car shows and places to go every weekend. There are so many things to do all year long, but when fall hits it can seem like there’s just so much more to try to fit into the weekend! I always want to make the most of what the season has to offer as well as all the local events.
To help us enjoy the season we love to be outdoors. My kids love raking leaves into piles to jump into, collecting different colored leaves and sticks for a scavenger hunt, or decorating for each holiday. There is just so much to do in our very own back yard! In fact, we were just taking a stroll down memory lane and reading some of my older blogs where I share some of our favorite fun things. Here is a quick recap of some kid friendly activities to do with your little ones at home:
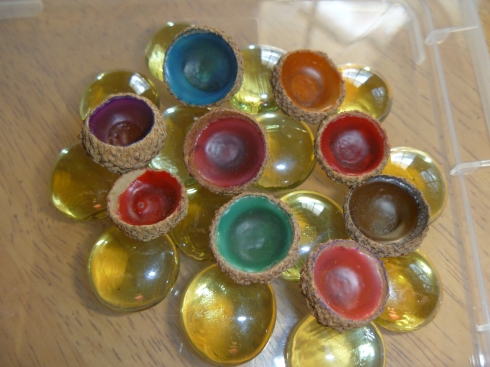
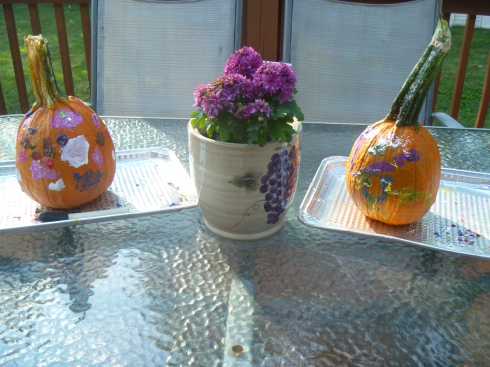
Acorn Jewels
This one is my absolute favorite! It is such a simple project, yet yields amazing results. You can read the step by step directions here. You can break this into two parts: gathering the acorns during a scavenger hunt, and then creating the jewels. Do it in the same day, or make it a two day event!
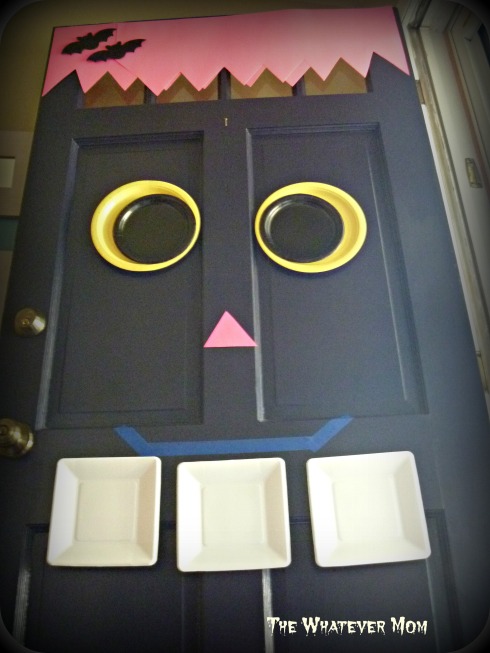
Make a Spooky Door
Recreate this monsterpiece to give your front door a touch of whimsy. You can find step by step details here. Using all simple supplies from the dollar store you can have the cutest door on the block for around $5.00.
Pumpkin Painting
If you have little ones not yet steady with the knife skills, let them wield a paint brush instead. Use washable paints and put down a plastic cloth. Or let them paint outside and not worry about your clean kitchen table. Click here to find out how to connect art with nature.
DIY Fossil Cookies
You don’t have to wait for any special season to make these. They are just fun to make! You can get your step by step guide here.
Apple Painting
If you missed my post last week, here it is again for you to enjoy! This one is a classic fall art project. Be sure to check out the links to some cute stories to go along with this simple art project.

The Whatever Mom is a full-time wife and twin mama living on coffee and wine. She enjoys the pure rush of cleaning the BIG potty between loads of laundry. It is her dream that moms everywhere accept and embrace the Whatever Mom philosophy which can be found here. You can also find her musings and popular shares on Facebook and Twitter. Stay up to date with her creative ideas and outings on Pinterest.

The fall weather seems to have arrived in one fell swoop over the weekend! It was super-hot one day and the next, just as cool and crisp as a freshly fallen apple. I admit I was lured outside by the bright blue sky, the calming breeze and sunlight. There were so many different ways to spend our Saturday, but my husband and I decided to split up with the twins and go our separate ways to give each kid their own date day. My date and I started our day at the local farmer’s market where they have a sweet art corner.
Every week there is a new, free art project to create. One week we colored and cut out bugs and glued them to a cut out paper jar. It was simple, it was easy and the kids really enjoyed it. Now they look forward to stopping by the tent every time we make a trip to our home town farmer’s market. This week was no exception. Well, except I only had one kid to help make a project with.
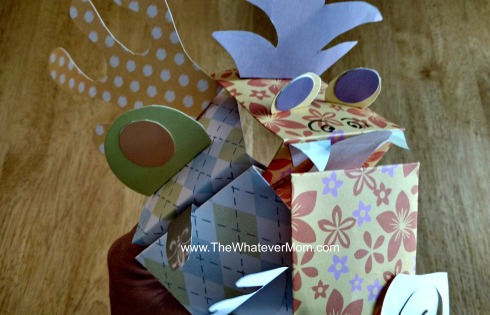
This week we learned to make paper hand puppets. I can’t get over how easy these are to make and there are no limits to what your imagination can bring to life. My girl decided she wanted to make a red horse, named Ham. Oh five year olds. Once we returned home she was excited to share with her sister how to make her own little puppets.
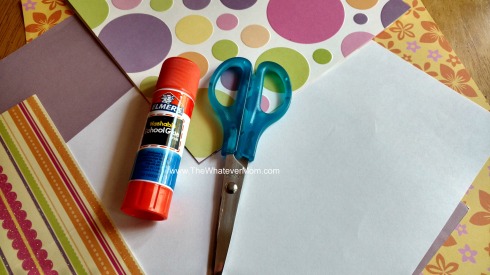
So here is how you can make your own:
Materials:
8×10 sheet of paper
Glue stick
Extra scrap paper in a variety of colors
Crayons/Markers/Pens (which ever you have on hand)
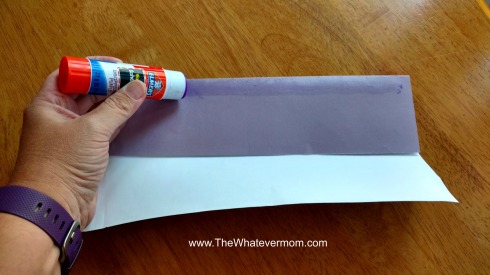
First fold the 8×10 paper, length wise, equally into thirds.
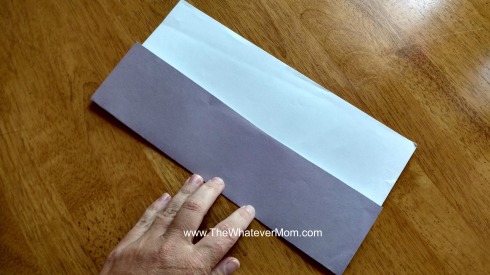
Next, glue the long edge against the opposite long edge s to create a seam.
With the seam side facing toward you fold the paper in half.
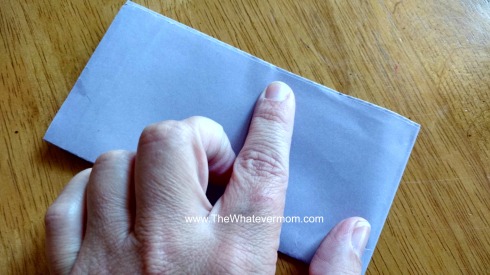
Then fold the short edge toward the short edge on both sides.
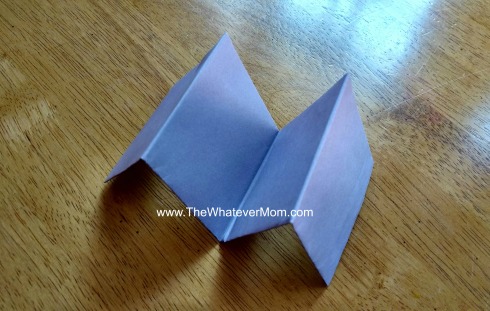
This is the base of your puppet, or its body.
Now you are ready to embellish and get creative! You can use the remaining scrap pieces of paper to make eyes, hair, ears, a tongue, a nose and anything else you can think of! Or just use a pen, marker or crayon to draw on details. Let your kids imaginations run wild!
This is such a quick and easy project your kids can easily make an entire cast of characters for a small puppet show. It is a great activity to bring out for kid parties, rainy days or even a sick day. Or simply because it’s Tuesday and you need something fun to do with the kids. Enjoy!
Does your farmer’s market have an art tent for kids to enjoy?
The Whatever Mom is a full-time wife and twin mama living on coffee and wine. She enjoys the pure rush of cleaning the BIG potty between loads of laundry. It is her dream that moms everywhere accept and embrace the Whatever Mom philosophy which can be found here. You can also find her musings and popular shares on Facebook and Twitter. Stay up to date with her creative ideas and outings on Pinterest.
