
You are currently browsing the category archive for the ‘Toddler Fun’ category.
With the warmer temps beginning this week I am looking forward to getting outside! However, it can be a challenge to get my kids outside. Once they are outside they will play, but I typically have to set the stage for them first. As a mom I am totally baffled by this. When I was a kid you could not keep me inside the house. I was happiest sitting outside under a big tree watching the clouds going by, or racing up and down the neighborhood street. Not sure how I ended up with two kids who need to be prompted to be outside.
I have discovered if I set a craft up outside they are more motivated to join me in the back yard and will likely stay outside longer. It can be a simple craft, or an entire project, but it helps transition to spending time outside.
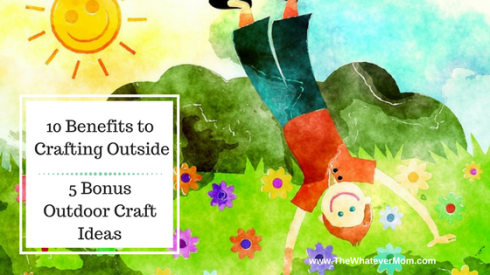
By now you all know the benefits to getting kids outside. But just in case, here are 5 more reasons:
- Kids who interact with nature tend to engage their imaginations more and invent their own games. This involves critical thinking and observation of what’s in their environment.
- When kids are more physically active they are building gross motor and fine motor skills.
- Kids who spend time outside more tend to develop a lifelong love of nature and see the need to preserve it.
- Kids tend to develop more visual and spacial skills when learning to navigate natural environments.
- Anyone who spends time outside feels less stressed.
You may have heard the benefits of kids crafting. I like to be thorough so again, here are 5 more benefits:
- Crafting benefits executive functioning. Having to plan a project or craft and lining up each step helps kids with focus and memory skills.
- Develops fine motor skills. This helps with handwriting and coordination.
- Helps kids recognize patterns and sequence recognition.
- Crafting builds on long term academic skills like math and reading.
- Teaches social interactions like learning to share and use manners when sharing.
Why not combine these benefits and craft outside? The bonus is you can make a mess outside and not worry about having to clean it up right away, or any of the materials staining your nice dining set.
Outside crafts to do with your kids
If you are tired of the old standby of bubbles and sidewalk chalk try these 5 things to amp up your outdoor craft time.
Make colorful bubble art. Simply pour some bubble mix into a shallow bowl and add food coloring. Mix well and use the bubble wand to soak up the mixture. Blow bubbles right in front of the paper or canvas to be sure they land and splatter on the surface. This will make a really unique print for your house. Or turn the paper into personalized stationary.
Paint some rocks. You can paint rocks to add some color to your back yard, or create a fun tick tack toe set by painting three similar rocks to look like lady bugs, and another three rocks a solid color. If you really want to make a fun project sign up to paint some Kindness Rocks to leave around your community, or for friends and family to find in your back yard.
Make your own fossils. This was fun when we did it with cookie dough, now I can’t wait to try it with baker’s clay. Simply roll a small piece of dough into a ball and press flat between your hands. Then press a leaf, or pine cone, or blades of grass into the clay to create a fossil imprint.
Design a paint brush from nature. Simply dip flowers into paint and press flat against your paper to make a pretty print. You can also dip leaves, feathers, a bundle of pine needles or stems into paint and use them like a paint brush.
Re-imagine your water table. When my kids were really little we used the water table for more than just water fun. We filled it with things like shaving cream, a bubble bath for dinosaurs and cornstarch with water (it creates a really fun solid that melts into your hand).
Crafting outside has long term benefits for kids, and the combined benefits create life long skills sets. You don’t need to wait for summer vacation to give any of these ideas a try. As soon as the weather is nice enough to be outside skip the chalk and do something a little different! Your kids will always remember the fun you have together, no matter the craft.
The Whatever Mom is a full-time wife and twin mama living on coffee and wine. She enjoys the pure rush of cleaning the BIG potty between loads of laundry. It is her dream that moms everywhere accept and embrace the Whatever Mom philosophy which can be found here. You can also find her musings and popular shares on Facebook and Twitter. Stay up to date with her creative ideas and outings on Pinterest.

Today we experienced the craziest snowstorm in our children’s lives! They watched out of the window for almost an hour with stunned looks on their faces as the snow fell. “Wow. Look at all that snow!” That hour gave me a little time to prep some fun things to do since we are now home-bound during the blizzard of 2017!
Last year I shared with you our favorite DIY Play Dough recipe. It is super simple to make and we make it smell great and get some really cool colors with Kool Aide. Well, this year we have discovered that our kids cannot tolerate artificial food coloring. Even though they aren’t eating the play dough (that I am aware of) the dye can still get in through the skin.
I see all of these amazing recipes for colorful play dough and we just can’t create them at home, and the all natural food dyes you buy in the store are very expensive. Making our own dyes is an option, but it is too time consuming. I still can’t get some of the beautiful pastel colors from making dyes at home. So, I had to find some way to make our newest batch of play dough fun and pretty.
The Recipe (as found on Hello Giggles):
1 Cup Flour
½ Cup Salt
3 TBSP Cream of Tartar
1 TBSP Oil (canola, coconut or sunflower)
10-20 Drops Essential Oil
½ Cup Boiling Water
Add all dry ingredients to the bowl, add all oil ingredients and then add hot water and mix until solid.
If we skip the food coloring the dough doesn’t look so special. But I thought I’d mix a batch anyway so we have something fun to play with. Maybe I’ll add a little essential oil to jazz it up. At least if it doesn’t smell like homemade dough made from flour it won’t be so bland.
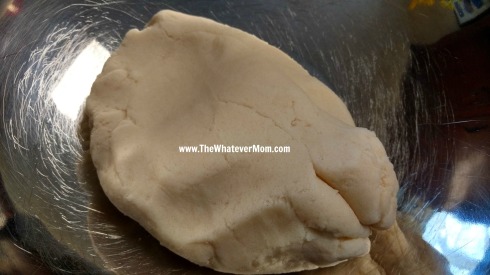
After I mixed it up in the bowl it sat there boring and blah. Until one of my daughters said to me, “Wow it’s white just like Elsa’s hair.” BINGO!! We have a winner!
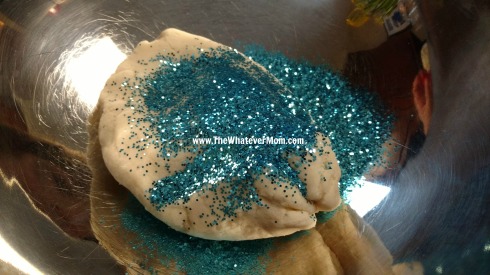
I decided to add in my favorite essential oil blend called “stress less” to help us let it go, let it go (ha! My friends who love puns will enjoy that one). Then my girl remembered we have some, “frosty blue glitter like Elsa’s dress.” And of course we dumped in as much as we could! My girls are ALL-IN when it comes to glitter.
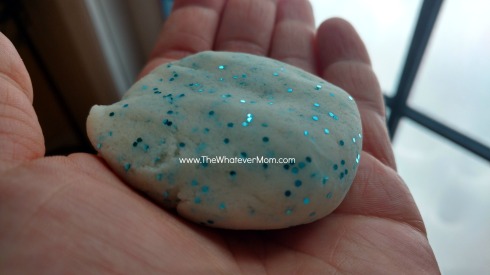
There ya go! Dye free and sparkly play dough that keeps the kids feeling stress free! Store it in a zip lock bag, or air tight container. Now if only cleaning up all this snow was as easy and stress free.
The Whatever Mom is a full-time wife and twin mama living on coffee and wine. She enjoys the pure rush of cleaning the BIG potty between loads of laundry. It is her dream that moms everywhere accept and embrace the Whatever Mom philosophy which can be found here. You can also find her musings and popular shares on Facebook and Twitter. Stay up to date with her creative ideas and outings on Pinterest.

A few months ago we decided not to throw our kids a birthday party. I know, how horrible. Instead we took a week-long vacation in the Berkshires. I get that sounds all pretentious but I swear we are average folks. I smuggle my peanut butter jelly sandwiches into places just like every other mom. But we decided for the cost of a two hour party we could give our kids some really fun experiences they will always remember.
We visited a lot of great places and enjoyed trips to several museums where we found science, art and history exhibits. We even saw a Teenage Mutant Ninja Turtle exhibit which made me and hubby feel a little old. Not only do we remember the first time we watched the original movie (which was playing on a continuous loop), but we remember playing a Nintendo game unit like the one now old enough to be on display as a “classic.”
I digress.
One of our favorite stops was the Eric Carle Museum of Picture Book Art. My kids loved making art in the art studio, reading and relaxing in the library and seeing art work from their favorite authors on display.
Here is what we enjoyed!

The art studio is a large sunlit room bursting with creativity. The resident artists select a craft project each day to share with visitors to the studio. All the materials and instruction are free. There are convenient drying wracks just outside the studio entrance where you can leave your creations while you tour the rest of the building. If you have kids of different ages and stages there are fun hands on play stations for your little ones to enjoy.
The galleries offer a look at original art work created by Eric Carle and other renowned picture book artists. Our favorite by far was the Brown Bear 50th Anniversary exhibit. We could see different versions of the way the animals were drawn. We immediately found the reading area which provided books and comfy brown bear cushions to cozy up to while reading. There are a variety of ways kids can interact with the art and games to help them talk about what they see. Each of the gallery rooms is minimal with plenty of room to navigate a stroller or wheel chair through. But no pictures are allowed for this exhibit.

The library was the big hit for my kids. Not only did they have access to kids’ books, but they were obsessed with the giant stuffed versions of the book characters they love. Brown Bear was carried around by just about every kid that came in. There are also lots of learning toys like latch puzzles, magnet puzzles and coloring pages. Hubby and I enjoyed getting to sit down and relax a bit while our kids had a safe place to roam. There are kids story times and other events taking place so be sure to check the schedule before you travel!
The Auditorium offers concerts and educational films. We arrived between movie viewings so we did not get to check out the auditorium. But you can check online to see what film or concert is being offered on the day you visit.
The Bookshop is filled with a lot of fun games, stuffed animals and unique gift ideas. We found some great post cards featuring art from our favorite Eric Carle books. I bought extras to frame when we return home.

Everything about this museum is designed with families in mind. You can request extra diapering supplies from the front desk, borrow a stroller or wheel chair and the coat room has individual lockers with a key to stash your diaper bag and extra stuff you don’t want to carry. There are activity kits to borrow to help your kids have a more interactive experience (I didn’t see those until we were on our way out). The museum admission price is also family friendly $22.50 covers a family of two adults and two kids.
Since our visit was in November it was a little too chilly to check out the art sprinkled along the walking trails and museum grounds. You can also find picnic tables outside to enjoy that homemade peanut butter sandwich right out in the open. Or you can stay inside and enjoy a non-smuggled lunch right in The Carle Café where they offer free coffee and organic/natural vending machine fare.
The museum is located in Amherst, MA which is approximately 2 hours from where we are in Ulster County. This is a great place to take your young art lover and little reader. It is a perfect day trip for families and especially accommodating for every age group. Older kids can read and learn details about the art exhibits, create art and there is plenty to keep their younger siblings busy and engaged.
The Whatever Mom is a full-time wife and twin mama living on coffee and wine. She enjoys the pure rush of cleaning the BIG potty between loads of laundry. It is her dream that moms everywhere accept and embrace the Whatever Mom philosophy which can be found here. You can also find her musings and popular shares on Facebook and Twitter. Stay up to date with her creative ideas and outings on Pinterest.
Last week I shared the Top 5 Fun Activities my kids enjoyed in 2016. This week I am sharing with you our most favorite places to visit. We did a lot more traveling this year than what I’ve shared on the blog. I just haven’t had time to update you all on the details yet. We tend to stick to local places of interest and make a few day trips through the year. But in 2016 we took a bonafide vacation and squeezed in some amazing museums and art! Keep an eye out for those future posts.
As I was digging through my posts to share with you today, I was reminded of my life with two very energetic toddlers who had two speeds: nap and full throttle. I spent a lot of time scouting safe places we could go and let them roam. Of course it also had to be educational, fun, and help them burn off some energy. So, I’ll start by sharing our favorite fun local places to go with little ones. We often look for free things to do, but sometimes fun comes with a price tag. With any luck it’s a small price tag. If you click on the name of the place it will take you to my original post about our experience at each location and you can find additional info links there.
LOCAL PLACES
Storm King– has to be our most favorite local place for sculptural art. Not only are the sculptures larger than life, but there is plenty of room for the kids to roam and run free. The paved walk ways make it easy to get strollers and wagons through. There are bathrooms and a café. It is very family friendly for all age groups and mobility. During the summer months they have one free admission day per month!

Trevor Zoo– this little local zoo is the perfect size for little people to enjoy. The paved path lends plenty of space and traction for little feet, and the exhibits are interesting. There are animals beyond our usual backyard habitats. Plenty of photo ops and room to burn off some energy!

Mohonk Visitor Center– this adorable area is perfect for moms who need a break from chasing kids. If your kids really need to stretch their legs, you can take them outside to the paved trail. Open all year and free to explore. If you want to check out other trails you can get a free one week pass offered once a year to Ulster County Residents. Or, you can sign up for the annual park membership and use any trail at any time.

Michael’s Farm– this private little farm located in Saugerties has a nice array of animals. There are farm animals, lamas, deer, ponies, emus and chickens. There are a lot of experiences to have in just one visit. They also offer camp sessions during the summer and school breaks. It is located off the beaten path and is very family friendly. We’ve enjoyed many visits and it is always a lot of fun!

DAY TRIPS
Animal Land– this one is our absolute favorite! The park is so clean, the animals are well taken care of and there are so many play areas for kids to enjoy. It is very stroller friendly, and is mostly covered by trees making it cooler on really sunny days. We traveled just over an hour from home, but spent half a day there playing and interacting with the animals.

Lake George – before this summer I had only ever spent an hour or two in Lake George. I was stopping through on my way home from another trip so, I had absolutely no idea how much this area has to offer. Returning with my little family was wonderful experience! We enjoyed local beaches, games on the main strip and found a little hideaway park that is perfect for little ones to burn off some energy.

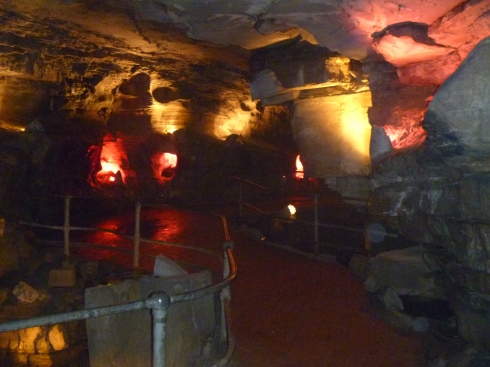
Howe’s Caverns– this is a special place for me. I grew up visiting the caves during school trips and just for fun with friends. Before you go you have to read this guide for the inside scoop. There is a lot you should know before going down below. I was excited to see how many new activities they have besides the caves. Plenty for us to go back to experience!
I hope this helps with planning out some fun trips in the new year, or maybe ideas for when you are feeling spontaneous. These are tried and true family favorites. We hope you enjoy them too!
The Whatever Mom is a full-time wife and twin mama living on coffee and wine. She enjoys the pure rush of cleaning the BIG potty between loads of laundry. It is her dream that moms everywhere accept and embrace the Whatever Mom philosophy which can be found here. You can also find her musings and popular shares on Facebook and Twitter. Stay up to date with her creative ideas and outings on Pinterest.
So this is a record breaking Christmas season here at the “casa de Whatever.” Not only did my husband and I put the tree up and decorate it without a complaint, but this is also the first time in a decade he has his Christmas shopping finished the first week of December. I know… give that man a round of applause. What’s his secret? Amazon, baby! Yep, he finally caught up with the times and shopped for everything online this year and had it shipped to the house.
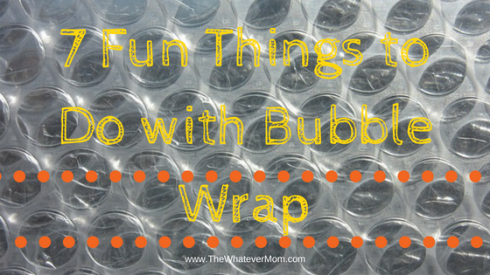
This may have saved him a lot of time, but now my house is filled with boxes and left over shipping supplies. And now, we have extraordinary amounts of bubble wrap! This is free entertainment! Popping it is so much, but I started to wonder what other fun I was missing out on.
Here are 7 Fun Things to Do with Bubble Wrap:
PRINTS
The bubbles on the plastic wrap make such a cool texture once you paint and print with it. You simply, lay a piece of bubble wrap flat, paint it and then flip it over to print on paper. Nope, you’re not missing a step, it really is that easy!
SHAPES
You can cut out different shapes to paint and print with. This works great for making animal shapes, especially animals with scales like a fish, or lizard. You can also just make shapes that your little one can recognize and let them pop away for a multi-sensory learning experience.
STOMP & PAINT
Wrap your kids’ feet in plastic wrap and let them stop around to make a popping sound. If you want to level up a parenting notch, let them walk through paint and step along a sheet of paper leaving behind tracks.
ROADWAY
Tape squares of bubble wrap, or a long piece of wrap to the floor. Use blue painters tape for easy removal and tape along the edges. Let your kid drive their cars over it until they pop every last bubble.
SENSORY FUN
If you have a small piece of bubble wrap, insert it into a Zip Lock baggie and pour in a little paint. Seal it up and let the kids (or you) squish it around. This has a really cool feel!
UNIQUE GIFTS
I found this on one Pinterest. Making a stress relief pack requires bubble wrap and a label that reads, “For maximum stress relief pop 3-4 capsules several times per day.” Super cute and fun! Give out to your kids teacher, the mail man, your office partners. Anyone who could use a good laugh for stress relief.
A few years ago when the girls were just toddlers, I took them to a Little Picasso art workshop at a local library where we painted bubble wrap. The kids absolutely loved it! It was messy and noisy fun for everyone! If you don’t want to get messy with paint, bubble wrap is totally fun on its own. Lay it on the floor and stomp on it, roll on it, go slow and pop one bubble at a time, or even roll it up and twist it. There is no wrong way to play with bubble wrap!
he Whatever Mom is a full-time wife and twin mama living on coffee and wine. She enjoys the pure rush of cleaning the BIG potty between loads of laundry. It is her dream that moms everywhere accept and embrace the Whatever Mom philosophy which can be found here. You can also find her musings and popular shares on Facebook and Twitter. Stay up to date with her creative ideas and outings on Pinterest.

Lately, I am feeling really bogged down by how much stuff we have. More specifically, how much stuff my kids have. It seems I have become the keeper of the stuff as I am the only qualified person to manage the 10,000 pieces of art my kids create and find a home for the millions of stuffed lovies they bring home. I spend a lot of time purging and finding storage solutions for all their stuff.
I recycled literally 17 different character cups the girls received from different birthday parties last year. We don’t need that many cups for only two kids. Having more than one kid means coming home with double, or triple the stuff from birthday parties, street fairs, library events or anywhere the freebies are being handed out. Don’t people ever think of the poor parents who have to now schlep this stuff home and find a place to keep it? Blerg!
Having twins means I am doubly blessed, and doubly blessed by all the extra stuff they own. Birthday’s mean double the toys and gifts. This also means I will have to find homes for all of them. As soon as the novelty of new toys wears off they leave them sitting in a corner somewhere.
As I was purging all the little plastic toys and notebooks and left over favors from our toy bins and toys my kids have outgrown, it got me thinking about our own gift giving. If I am annoyed at getting all these “things” I have to take care of, surely other parents are annoyed when I give these things too right?
So, here is my Gift Giving Guide for Less Crap for Parents to Take Care Of! Consult this list before the next birthday party you attend and I promise everyone will think you are a gift giving pro!
- Buy a kid an experience. Pick up a gift certificate to a local craft store or a bouncy place, adventure park or ceramics studio. Kids can cash in their gift certificates for a day of fun with no tiny made in china plastic toys left over! Think about the places you visit often with your kids and buy them some time there.
- Make A CD. Seriously, go old school and make a hit-list of fun songs that you and your child will enjoy dancing and singing along to. It is travel friendly and requires very little space. Pop it into your car CD player, computer or play at home. Make a unique cover with their picture on it, or include a treasured photo.
- Get a gift certificate to the popular local ice cream shop. Most kids love getting ice cream any time of year and it saves the parents a couple of bucks when buying their kid a fun treat.
- Send them to the movies. Going to the movies requires a second mortgage for most families. Buying tickets for the birthday child means one less ticket a parent has to pay for. Add in some bonus bucks to cover a snack at the concession stand (totally optional). Treat your child to a date day at the movies.
- Get them museum tickets. Not a super fancy grown-up museum, but a children’s museum. Again, the birthday child will get hours of entertainment and fun memories without cluttering up an area of your house.
- Contribute to their favorite activity. Many families cannot afford to send their kids to places like the Little Gym, or a music for tot’s program. Purchasing a gift certificate, or contributing cash they can apply toward the tuition cost will be a great help to parents and kids will get months of enjoyment! (That’s longer than they’ll play with that brand new toy).
- If gift certificates feel too impersonal and you feel like you really need to buy something for the birthday child a gift basket with a theme is a great idea. If the child is really into art maybe some simple art supplies or a nice set of pencils. A movie night with a DVD and snacks. Make it something they can actually use.
- A personalized t-shirt they can wear. Kids grow out of clothes so quickly parents can hardly keep up. So extra outfits for birthdays and holidays goes a long way. Make a fun t-shirt with a picture of you with the birthday child, or maybe a silly saying on it. Personalizing it means it is truly one of a kind and no one else will give the same gift!
- Give them a coupon book for adventure. This is really great for your own kids, nieces and nephews or grandchildren. Life can get so busy and hectic that we forget to just stop and enjoy simply spending time with our loved ones. Create an adventure coupon book and set a date the child can cash in!
- Make a Memory. Have a favorite baby outfit or favorite sports jersey turned into a keepsake. Memory bears, or even a pillow or quilt they can grow up loving and take with them when they set out into the world is an amazing gift that will be treasured forever.
- Buy them a piece of the moon. You can purchase a small plot of “land” on the moon. Your child can hang the framed certificate of ownership on their bedroom wall.Or, you can have star named after them.
- Make a donation to an endangered species. Most kids have a favorite animal. If it falls into the endangered species category you can pay to adopt one of the animals. Or, you can make a donation in their name to a zoo that does have their favorite animal.
- Skip the gifts entirely. When my girls were babies we didn’t need much for them. They were more entertained by cardboard boxes than light up toys. So, we asked friends to please bring a gently used coat or snow suit their child has outgrown to donate to our local foster care department.
You may be worried there is nothing left “to show” for a birthday gift. I assure you a plastic toy has a limited lifetime of enjoyment, but the memories kids make out of an experience will last a lifetime. And parents will thank you for not giving them something extra to take care of.
The Whatever Mom is a full-time wife and twin mama living on coffee and wine. She enjoys the pure rush of cleaning the BIG potty between loads of laundry. It is her dream that moms everywhere accept and embrace the Whatever Mom philosophy which can be found here. You can also find her musings and popular shares on Facebook and Twitter. Stay up to date with her creative ideas and outings on Pinterest.
Related Articles: Give The Gift of Swag
Last week I shared that I am starting our own back yard summer camp as our last hoorah before Kindergarten. The girls are pretty on board with this idea and I am looking forward to saving some money. It gets expensive sending two off to camp at once. Plus, I just want to squeeze out as much time as I can from what is possibly our last summer together. We still have a few more weeks of school left, and summer hasn’t “officially” begun, but we have already started on our list of fun camp projects.
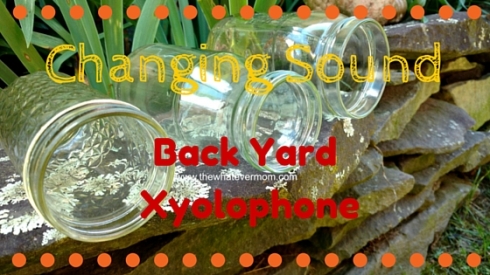
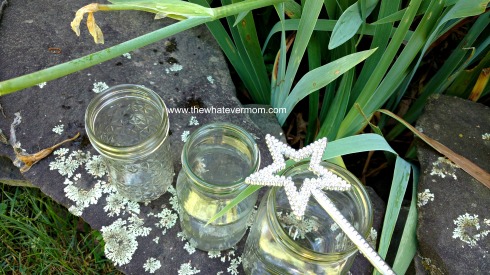
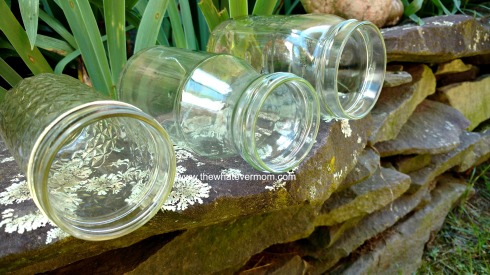
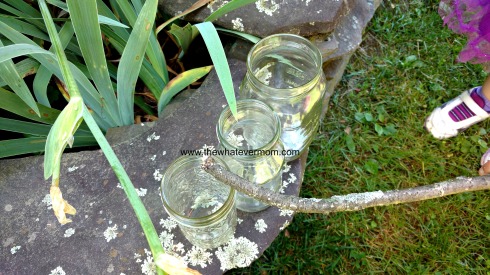
Music is one of our favorite ways to play, connect and relax. We always have the radio on, or a kid favorite CD playing (yes we actually still use those), we are singing or we are making music out of pots and spoons. Music is really everywhere and I love when my kids find ways to create music on their own. This week we discovered outdoor xylophones using glass jars. That’s it. Glass jars we already have on hand. (If you have a really tiny tot you can use various sized plastic jars, or cardboard containers, or small boxes).
I simply removed the label and took them outside!
Start by finding a level safe spot to line up your jars. We chose the rock wall in our garden. You can use as many jars as you like, but we kept it simple with just three. When you use a variety of jars with different sizes and thickness you will get a more interesting sound.

You can’t play a xylophone without a mallet (I actually knew it is called a mallet!). Help your little one find a stick, or a wooden spoon to use as your mallet. You can even bring out a variety of mallets to sample. Each one will make a different sound.
We used various sized sticks and then the girls realized perhaps their magic wands would help make an interesting sound. I love that this got the girls thinking about what they could use to create a new sound. They immediately noticed the different pitch each glass makes. And of course being the overly ambitious bunch we are, we tried to play songs we already know like “Twinkle, Twinkle.” Did not work, but it was a good effort.
Try turning the jars on their sides to hear how they make a different sound. It is definitely a heavier sound than the slight “plink” when the jars are standing.
We played for a short time for the “fairies” hiding in the garden before my girls brought out the big drums. Yes, I actually gave my kids a kid sized drum kit complete with cymbals, and a kick pedal for a nice booming bass. I am sure our neighbors know how much we love music by now.
You can change the pitch and sound of each jar by adding water, rocks, glass beads or pine cones and flowers to the jars. The desired effect is to hear how sound is changed. This is a great project for toddlers (with supervision of course) and older kids. Let your kids fill in the jars and give them space to jam away with a mallet they choose.
Trust me any kid is going to love to bang around and make some noise. This is such a minimal and simple way to engage your kids in a new way to create music. Forget those Fisher Price toys, use what you have. Much like playing with a cardboard box, kids will enjoy anything you give them to play and create!
I hope you enjoy this super easy and cheap project! I wonder what we’ll do next!?
The Whatever Mom is a full-time wife and twin mama living on coffee and wine. She enjoys the pure rush of cleaning the BIG potty between loads of laundry. It is her dream that moms everywhere accept and embrace the Whatever Mom philosophy which can be found here. You can also find her musings and popular shares on Facebook and Twitter. Stay up to date with her creative ideas and outings on Pinterest.
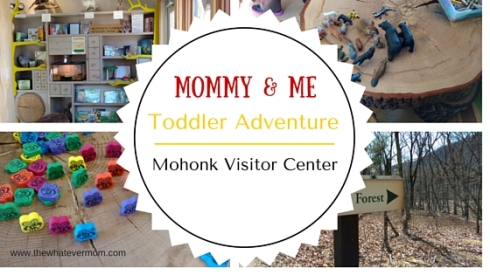
At the beginning of every summer I try to round up a few new places to visit with the kids. Now that my kids are getting older they are outgrowing some of the play spaces we used to visit. One thing that hasn’t changed is their desire to explore.
Last month our family signed up for a free Healthy Ulster Membership at the Mohonk Preserve. The Visitor Center Trailhead is located at 3197 State Route 55, Gardiner, NY. While we were there we were encouraged to explore the visitor center which includes an interactive children’s corner. And by corner I mean an area too small for a crowd, or big group. But it is perfect for a handful of friends to gather for play.
Here is what we found during our exploration:
Interactive Exhibits
When you enter the center you are on the upper level. There are interactive exhibits where kids can learn about the land within the Mohonk preserve, the animals they can find and the Geoexchange system running the center. Your toddler won’t understand a whole lot of this information, but they will love getting to push the buttons and using the swipe screen to get to the next slide of information while your older child interacts on their own.
There are amazing views all around so be sure to simply take a moment to enjoy looking out the large windows at the surrounding landscape.
Children’s Corner
After you make your way through the upper level take the stairs down to the children’s corner. There is something there for kids of any young age. There are books, games and puzzles about nature. There are a few live animals to see and kids can unearth animal bones. You can even borrow a nature exploration kit and wander through the Children’s Forest right outside the center.

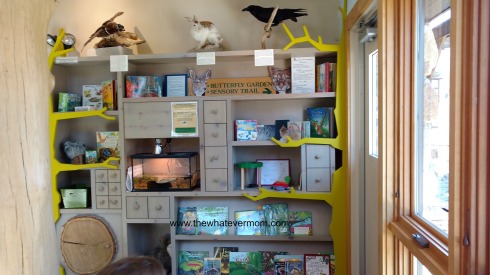
Sensory Trail
This is a paved trail that is perfect for strollers and for toddlers learning to walk. Simply follow the path and allow your little ones to explore the artwork, butterfly gardens and views along the way. The paved path leads into the Children’s Forest where there are fun things to play with. We found a tee pee style hut made with sticks and a whole lot of natural things to keep our exploration thinking caps busy. Allow your kid to be your guide and follow along at their pace. You will be amazed by the amount of questions they begin asking.

What got my kids the MOST excited? The little animal nook tucked away under the stairs in the children’s corner. Beyond these doors is a hidden little room where kids can sit with the many stuffed creatures and use their playtime imaginations. Moms can sit quietly on a bench and feed babies, or chat with another mom.


The visitor center is open 9 am – 5 pm daily (except holidays) all year. It is free to explore the children’s corner and the sensory trail just outside which leads to the children’s forest. Pack a snack and invite a friend for an easy morning of play, or bring your lunch for an afternoon of pint sized fun! For more information click here.
Even though my kids are no longer toddlers we enjoyed this day out together. I wish I knew about it when my kids were little and we needed a safe place to explore. It’s a great place to wear out little ones with play time adventures before nap. Older kids (I’d say up to age 8) can enjoy the activities here as well. A great little stop for moms of kids with toddlers or mixed ages.
The Whatever Mom is a full-time wife and twin mama living on coffee and wine. She enjoys the pure rush of cleaning the BIG potty between loads of laundry. It is her dream that moms everywhere accept and embrace the Whatever Mom philosophy which can be found here. You can also find her musings and popular shares on Facebook and Twitter.
Spring is officially here! The days are lighter longer and starting to warm up. It’s the perfect time to start planning a garden. Every year I say I’m going to grow everything and I make a plan, but someones cat will crush my tomatoes, or the pumpkins grow into the zucchinis. Learning to grow things can be frustrating. But, I really want my girls to see where all the veggies (they refuse to eat) come from.
I ordered this growing kit through a Scholastic classroom fundraiser. My kids could not wait to rip it open and get started.
It comes with it’s own seed packets, a double sided poster about plant life and a little growing box. My kids really don’t care what we grow, they just want to watch it grow. This little see through box will give them that experience! Not sure who is more excited here. 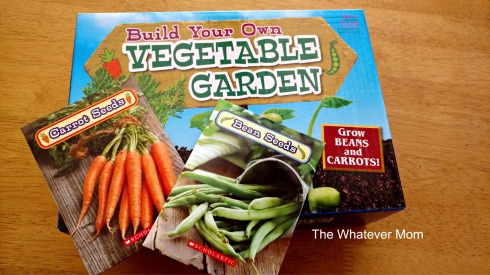
Here is what our project looked like:

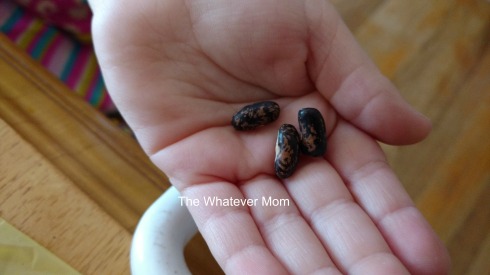
We read the plant poster to kick off the science part of it. But, my girls were just too excited to hurry up and plant the seeds.
We pooled our materials: potting soil, gloves, shovel and a tray to catch all the dirt that spilled over the sides as we scooped.
We filled the growing box with dirt, poked a small hole in the soil big enough to fit our seeds in. Covered it with a light layer of soil. We lightly watered so our seeds had plenty to grow on.
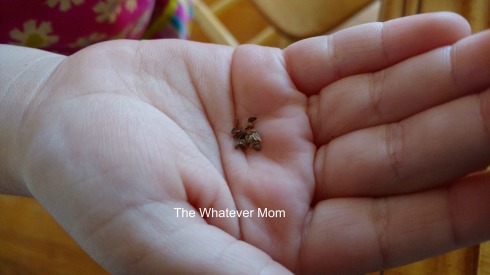
We covered our garden growing kit with a Ziploc bag. The instructions say to use Saran wrap or plastic wrap. We had neither. So Ziploc baggie it is! This is just to help the soil to retain moisture and create a little greenhouse inside the box. After 12 days we should see the germinated seed start to sprout. Until then we check it every day and mark on the poster what progress we see.

I thought we did everything right. That is until my kids pointed out that we forgot one very important step. We forgot to add the love. So, this picture is of them sprinkling their tiny seeds with love to make them grow faster. They are right. Everything we do should be done with love!
Are you building a garden this year? Do your kids like to help? Please share gardening tips with kids below!
The Whatever Mom is a full-time wife and twin mama living on coffee and wine. She enjoys the pure rush of cleaning the BIG potty between loads of laundry. It is her dream that moms everywhere accept and embrace the Whatever Mom philosophy which can be found here.
Happy Saint Patrick’s Day!!
This week has been all about rainbows at our house. We’ve colored rainbows, made macaroni art rainbows and now we are making homemade water color paints in rainbow colors of course!
Have you watched that video going viral on Facebook of how to make water color paints out of pantry supplies and ice cube trays? Well, I thought with the amount of painting my girls do it would be economical to make our paints in large cubes. Plus, it is a fun project to keep them busy. So, here is a look at what we did!
Recipe: 1 cup of baking soda
3/4 cup vinegar
2 TBSP Corn Syrup
1 cub corn starch
Food coloring
Start by adding baking soda to glass measuring cup or bowl. Next slowly pour in the vinegar (it will get fizzy which the kids love). Add in the corn syrup and the corn starch next.
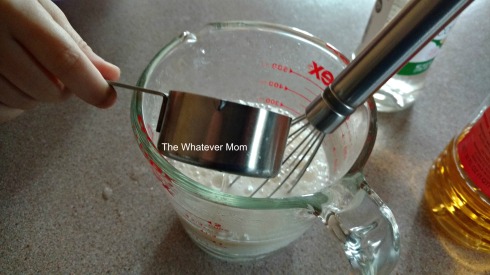
Have you ever mixed cornstarch and water together before? It makes this crazy consistency of a solid that kind of melts into a liquid. It’s pretty cool to play with. Don’t be alarmed that the more you try to stir this the less it seems to mix together. It will go between a solid and a liquid between stirring. Don’t worry you’re doing it right!

Next pour the mixture evenly into ice cube trays. Be careful not to fill all the way to the top! Once you add in your food coloring and try to stir you will spill all the colors into one! 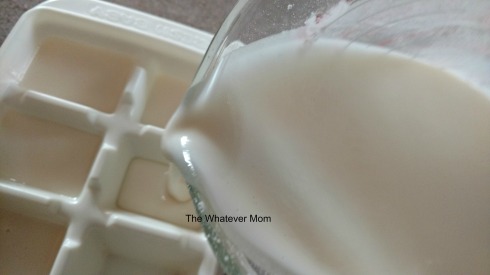
There was plenty of this mix to make two trays of paints. The first tray we made a rainbow of colors.
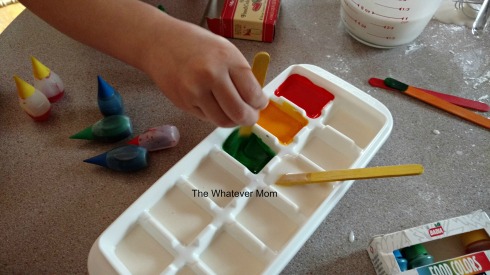
The next tray we made all green in honor of St. Patrick’s Day (and because the kids used all the red dye in the first tray of paints).
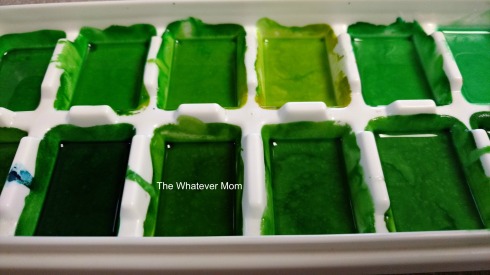
Once you have mixed all your colors, leave the trays out over night to dry. I attempted to freeze one tray to get it to dry faster. But, it just melted and became liquid again. So, I left both trays out on our counter. Both trays still have a fine layer of liquid color sitting on the top of each cube. I think that is from the corn syrup. These paints look just as shiny as the new sets at the store.
This is a really great activity to pull out on a rainy day. What better way to brighten your day than to paint a rainbow?! This is a messy project so be sure you use a tray, or newspaper underneath. Food coloring does stain so wipe up any drops right away so you don’t leave behind spots on your counter tops. When the kids are ready to paint make sure they are wearing clothes that are OK to get messy in.
This was a really fun project to make with the kids. They enjoyed making their own paints and getting to be a part of the process. If only they were as excited to clean up after these sorts of projects.
The Whatever Mom is a full-time wife and twin mama living on coffee and wine. She enjoys the pure rush of cleaning the BIG potty between loads of laundry. It is her dream that moms everywhere accept and embrace the Whatever Mom philosophy which can be found here.
